Tag: tips


9 tips for getting the most out of your postach.io blog


9 tips for getting the most out of your postach.io blog.


  • Be sure to select your theme before modifying any HTML (source code). A new theme overwrites your old code.
  • Use your default notebook for drafts. When you wish to publish, 'copy' the note (right click, select 'copy' from your note list) into your postach.io notebook. You have the option to also copy the tags. You'll also be able to choose the date of your post - either the date of the original draft, or today's date. If you choose the original date, your post may appear below other recent posts - even on page 2 or 3 of your blog!
  • Don't change the title of a published post. This will change its URL and anyone who bookmarked your post will lose it.
  • Choose the title of your post carefully. It should indicate the subject matter of your post to improve your search engine ranking. Another tip on improving your ranking is make a subtitle the same as the title of your post as a heading for your post.
  • If you haven't already done so, investigate Google Analytics. It is easy to set up with clear instructions, and gives you a lot of powerful information about your visitors.
  • Make sure the source URL box on your note is clear before you publish, or else you will just publish that link, instead of your post. This trap keeps catching me...
  • If you happen to experience a glitch, try manually syncing your blog with Evernote, using your postach.io dashboard, by clicking on the little sync button:

  • To embed a Youtube video into your blog page, just insert the code supplied by Youtube right in your note - eg:
(It didn't work in this post because the code above is a picture of the text. If I'd put the raw code in, you would have seen a video here.)

If you found this post helpful, please share it on social media. If you want to make my day, leave a comment.

If you get stuck with these tips, just leave a comment and I'll try to clarify. Note that I'm not associated with Postach.io. I'm just a user, like you :)

Brad Lemon
25th July 2013

A footnote: If your note is slow to post on your blog, there could be a couple of reasons for this. The servers might be busy, and you're in the queue but it takes up to 5 minutes sometimes to process and post. Notes with lots of images in them seem to take longer to parse through the servers than plain text. If you don't see your post after 5 minutes, try manually syncing your blog using the instructions above. That 5 minutes can be the longest wait of your life, but try to wait before manually syncing.

Update: This is worth watching:


Stacking Photographs.

The how and why of making a composite photograph.
Or... How to use RegiStax.

     When the shutter on the camera opens, billions of photons strike the camera's sensor. No matter what type of sensor your camera has, it is not perfect, and cannot capture all the photons that strike it. Every time you open the shutter, a different picture is captured. If you take ten pictures of the same scene, you can be comfortable that your sensor has picked up a lot more information, because it has been exposed ten times, and while each single picture doesn't catch ALL the photons, ten pictures captures most of them.

     HDR photography uses a set of three pictures taken at slightly different exposures, and stacked together. This is a feature of many cameras now, and the finished HDR picture is much better than any single picture because the sensor has been exposed to the scene three times, capturing more photons than a single shot.

     The weaker the light source, the more there is to be gained from stacking, and therefore stacks of more than three pictures are used to photograph the Moon and stars. Stacks of ten are common, and stacks of 50 are easily worked with, and create a fantastic product. I've heard of professionals stacking 300 photos together, but I've never attempted this! 50 is my maximum stack for now, but a stack of just ten is a vast improvement over even HDR photography - simply because there is more detail captured on the sensor in ten exposures.

Single image:

Stacked image of ten exposures:

I have resized these images differently, but the first image is actually one of the images used in the stack of ten to make the second shot.

You can see that there is a big difference in these two images. The writing on the Tardis is much clearer and more detail stands out. This is very important to get a good pic of the Moon, because of the subtle textures.


The above shot was my very first ever attempt at stacking. I was a little heavy handed on the sliders, but the effect is still pleasing.

Jupiter an moons:

How to do it.

You'll need a bit of kit called 'RegiStax'. It's available for Windows as a free download, no catches. IKR! You can find it here: http://www.astronomie.be/registax/

Scroll down the page to this entry. Click the link and download RegiStax 6.

If you think you'll use this program a lot, then install the update as well since you're here. If you just want to try stacking, forget the update for now.

Follow the instructions to install it. I don't remember any sneaky tricks - it's pretty honest software.

Once installed, you should find an icon on your desktop that looks like this:

You're ready to rock and roll!

Find a still-life study, and take ten identical shots of it. You'll need a tripod; you can't do this hand-held. If you don't have a tripod, use a pillow or beanbag (wheat-packs are great) to rest your camera on. As you'll want perfect captures, use a remote trigger, or the timer release function for your shutter to eliminate any camera shake when you press the shutter-button. Some cameras can be set take ten exposures in a row (lucky buggers).

When you have ten captures uploaded to your computer, smile, and run RegiStax.


When RegiStax opens, you'll have this on your screen. You don't need to adjust anything or check any boxes. It works right out of the box. Click on 'Select' to choose the ten images you have ready for stacking.


Now, you have to select ALL the images you wish to stack. You can either Ctrl-left click your images one by one until they are all selected. Or you can select the first in your set, then hold down Ctrl-Shift-left click the last image, to select all the ten images at once. As long as you have all ten images selected. They should be listed in the 'File name:' box. Hit 'Open' to load your ten images.

You can check all images were loaded by looking down the bottom at your frame count. If you don't have ten images, restart RegiStax and select them again.

That's the hardest part over.

Now, go to the top left, and click on 'Set Alignpoints'.


RegiStax will think for a moment, then cover your image in red dots. The green bar will move to the next icon along.


That green bar always indicates the next process is ready to be completed. Click on 'Align'.

Registax will think for a bit, then the green bar will move across to 'Limit':

Click on 'Limit'. Notice we haven't touched any of the adjustments.


The screen will change to look like the pic above. You can now press 'Stack'. It will take quite some time. Be patient. When the progress bar reaches 100% you're ready for the next step.


There is no need to save your image yet. Click on the 'Wavelet' tab above.

Now your artistic eye is needed.


Adjust the sliders for layers 1 through 6. Each of these is a different part of the wavelength. Watch the preview and just nudge all the sliders up a little bit. You'll notice the change. Fiddle with the sliders until you get a pleasing effect for your eye. I find I need a whisker more on layers 5 and 6 than the other layers.

Once you're happy with your preview, hit the 'Do All' button, which should be underlined with a green bar.

Watch the progress bar slowly climb...

When the bar gets to 100% it will stop, of course. The 'Do All' button will still be underlined, but you're done. Hit the 'Save image' button.


Give your stacked file a distinctive name. I usually add an 's' to the end of my file name - ie, 'IMG_7016s'.

Your stacked image is in full resolution. Use your normal method to resize it.

Congratulations, you just stacked your first ten images, and now have the finished product. You may decide later on that you were too heavy handed on the sliders, as I did when I first started. You get better at it as you go.

If you found this post helpful, please recommend it to others, thanks :)

Best of luck stacking. If you get REALLY stuck - you can contact me on Twitter - @tyabblemons, or leave a comment here - but don't expect miracles, I don't work for RegiStax.

Good luck!

Brad Lemon
6/07/2013


Functions I'd like for Evernote

Desktop features:
  • A highlighting pen
  • The ability to input in html
  • Embedded video
  • An icon for strike-through text format on the toolbar in desktop client.
Web related features:

     The only reason I would use a blog rather than Evernote is the ability for the reader to insert comments, and statistics. Otherwise, Evernote is a crisp, clean blogging platform. I'm using it now.
  • A preview of the page as it would appear published on the web. The web version format varies considerably from the note on the desktop client, mainly in line spacing.
  • Ability for readers to insert moderated comments at the bottom of the web page. (Yeah, I know, big ask. Perhaps a 'write-only' note?)
  • Style-sheets or another way to change theme for published version.
  • Readership statistics for web-page views. The ability to embed html widgets would achieve this.
First published 4/07/2013 5:58 PM by Brad Lemon.


Why use Evernote?


How to capture stuff.

Do you use Evernote? You don't? Got a minute? This could change the way you do things.

How do you capture stuff? Maybe the trusty old way of hitting the PrintScrn button, then opening Paint, then pasting it in... And you've got a screen cap. Now, where to file it? Maybe you've found the Windows7 Snipping Tool, and create images that way - much faster, but still, where to file them?

Wait a minute, you don't capture stuff? Well how do you...? Oh, never mind - I'm jealous of you. You're still in 2010, but it's 2013, so catch up :P Lots of reasons to capture stuff these days. Social media posts can be deleted, and if you've taken action or made a comment based on that post, you could be left high & dry. It's happened to me. I do a lot of work in Twitter, and tweets are often deleted. Therefore, I have to capture important tweets. The old fashioned way is too slow, and I would have hundreds of little files scattered all throughout my computer. Evernote solves all this, and it does much more. You can capture whole web pages as they appear at that moment. This is important if you wanna catch a dodgy article on a news website - they often delete or change their own stuff. Sick of downloading pictures just to upload them somewhere else straight away? With Evernote, you can just click 'copy' from your browser, and 'paste' the picture into a note. Copy the pic from your note and paste straight into your email client. With an add-on it's even quicker. It's now fully searchable, and you don't have a gazillion files cluttering up your desktop. Of course you can save the picture to your computer from Evernote as a file if you wish. Sick of transferring pics from your phone to your computer (or other devices)? 'Copy' the pic into a note. Done. Yep, that quick.

Evernote is free. For $5 per month you can get some really fancy features which I use, but they're not necessary.

What is Evernote?


I know, it looks nasty. Don't be put off just yet. Ignore the toolbar up the top, although I think you can work that out. The next toolbar down looks like this:


You can keep multiple notebooks in Evernote. So if you've got a project on the go, you can keep all your stuff related to that in its own notebook. Tags are optional - you can use them to help organise your notes. I do; it aids searches. 'Web Clips', 'Mobile', and 'Files' just helps you sort notes. The 'CFA Warnings and Incidents page' and all to the right of that are links to notes I commonly use. Below this, we see three panes. The left pane is where you quickly access different notebooks, your tags and other such stuff. The middle pane is my list of notes. As you can see, I have 425 notes. The right-hand pane is the guts of my note. By using the magic outlined in this post, I captured this post while I was writing it... But that's enough pretending to be Doctor Who.

Once you've created a note, you can of course share it, in a number of ways. You can email it, post it to social media, or make a public link that anyone can see, which is how I shared this post. You can even share whole notebooks with other people for collaboration. We have a note for our shopping list that can be accessed from any device - shared between Rose and myself. Either of us can add to it at any time. My wishlist is shared too, you'll notice. When I find nifty stuff on the net, I capture the page and keep it in my wishlist notebook. Rose can see it too, and if anyone asks her what to buy me for a gift, she can find a few ideas there. I know, I'm forward, eh? It hasn't worked yet, but I'll let you know if it does.

Once you've created a few notes, you'll feel comfortable driving the interface. It's pretty simple and intuitive. Of course, you'll be able to keep track of your notes in your mind - and they'll all be listed in that middle pane, right? Forget that! I can't hold 425 notes in my head! The real power of Evernote is its search function. It's very powerful, and quick & easy to drive. There are advanced search operators for when you get good at it. Evernote's search function is so powerful, that it even searches for words in pictures! If you take a pic of say, a road sign, and then search for the name on the sign, Evernote will find it for you. I don't know of any other search function that can do this. A lot of my notes are just pictures of things like whiteboards. Here's an example:


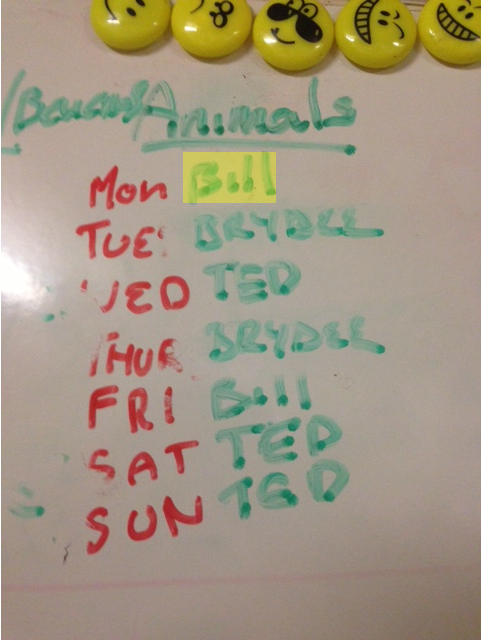
Here, I've performed a search for the word 'Bill'. Evernote has found it in this note about who's turn it is to feed the animals, and marked it with a yellow highlight. Evernote easily searches for text in pictures. No more taking notes during a presentation - I just take pics of the whiteboard or projector slide and copy it into Evernote. I can search it up later. The search function is Evernote's most powerful tool. It is as powerful, or more so, than Google. You can't lose a note - if you can remember just one thing about it, that is enough. Might take you a bit to hunt through the results though, if you can only remember one thing about it.

Any word in any picture can be searched, including handwriting, as you can see here. 'Bill' is not much of a search term, with only four letters, but I found this no problem among all the notes that mention Bill. I could have narrowed this search down by including the word 'animals', but I was lazy.

When you think about it, searching for data you've captured is actually the trick to managing your captures. I used to have hundreds of individual files cluttering up my desktop and 'my documents' file. The Windows search function is, well, bad. Also, you can't share it across all your devices. Evernote comes for PC, MAC, Android and iOS. Can't remember if they have a Linux version, but it rings a bell. So no matter what smartphone you have, it will run Evernote. Unless it's a Windows phone. Just throw that away okay?

Captured!

Storing and searching for all this data is one thing, but how do you capture it all? Good question, I'm glad I asked it. Well, we talked about the old PrintScrn button, and copying it into Paint. I still use this if I have to capture something very quickly - like instantly (only now I paste it straight into Evernote, bypassing Paint). But that's very rare. The best method is to use the Windows7 Snipping Tool. Where is that, you ask? Click on the Start button, then type 'snipping tool' into the 'search programs and files' box. When the result appears, right-click and choose 'Pin to taskbar'. Now, it'll always be down the bottom on your taskbar for quick access. This is a funny little tool that takes some getting used to. Once mastered, it is THE killer tool for your computer. If you haven't got Windows7 just download any old snipping tool, you only need to make an image of what's on your screen. Now, the Snipping Tool automatically copies the clip to your clipboard, so all you have to do is paste it into Evernote. Really easy, and quick. The Snipping Tool has another feature I use a lot - the highlighting pen. Handy!

So now you've got your data captured and pasted into a note. All you need to do is add your title, or let Evernote choose the title for you - it's intuitive. Add some tags if you want. Put some text on your note to remind yourself why you captured a picture of your cousin's pork roast - free-range pork, of course! Say no to factory-farming! (See what I did there?)

Finally -

We all have to capture data at some point in our lives. That's not so much the problem, but storing it is. And how do you capture a Facebook page with ALL the comments? Well, an Evernote add-on for your browser (Evernote Web Clipper) captures web-pages really well, including Facey posts. For when the Snipping Tool just won't cut it. I never use the favourites function (bookmark) of my browser anymore. If I'm interested in a page, I capture the page (Evernote puts in the URL automatically), and that way I can easily search the web-pages that I am interested in. If I want the live page, I just click the link that Evernote stored with the page.

Evernote changed my life. I used to have (still have!) lots of Word documents and Notepad files scattered all around my 'puter. I couldn't share them easily, and I couldn't search them. Have a look at your desktop. How many images are just sitting there? How many text files? Links? Video files? All that stuff can get stored away in Evernote, fully searchable. Evernote doesn't support embedded video yet, but it's coming soon. For now, you can still put a video file in your note and even play it from there. You can also store sound files, MP3s etc. You can store Word documents, so I have no excuse for not cleaning up my 'my documents' folder, but I'm lazy. You can store just about any kind of media. I also use Evernote for writing. Most of my work is done in Evernote and shared. Sometimes, I'll copy/paste the text out to hide the fact that I'm using Evernote. I publish to the web with Evernote. It's always open, and I'm always dumping data into it. It doesn't matter how many notes you make, there is no limit. And you can search them all.

Here's a link to the Evernote home page: https://evernote.com/ It's free, easy to download and install, and there are no sneaky tricks. The download button is big, and right there on the home page. If you haven't got a Snipping Tool and need a tip about getting one, just message me on Twitter (@tyabblemons). Thanks for reading this, and good luck with your new life, all captured, stored, organised and searchable.

Brad Lemon
14/06/2013


comments powered by Disqus